Sticky Honey Garlic Chicken Bites with Vegetable Egg Fried Rice

There’s something incredibly satisfying about a bowl of warm, flavorful fried rice topped with golden chicken bites covered in a sweet, sticky sauce. It’s the kind of meal that reminds you of your favorite takeout dinner, except it’s freshly made in your own kitchen with simple ingredients and plenty of homemade goodness.
These Sticky Honey Garlic Chicken Bites with Vegetable Egg Fried Rice bring together everything you could want in a comforting family meal. The chicken is lightly crispy on the outside, tender and juicy on the inside, and coated in a glossy honey garlic glaze that’s the perfect balance of sweet, savory, and tangy.
Underneath those delicious chicken bites is a generous serving of fluffy jasmine rice, tossed with soft scrambled eggs, colorful peas, carrots, sweet corn, and fragrant garlic. Every spoonful offers a wonderful combination of textures and flavors, from the sticky glazed chicken to the lightly toasted rice and tender vegetables.
What makes this recipe especially enjoyable is how easily it transforms everyday ingredients into something that feels like a restaurant-style dinner. It’s perfect for busy weeknights, relaxed weekend meals, family gatherings, or those evenings when you’re craving something more exciting than your usual chicken and rice.
And once that sweet garlic aroma starts filling the kitchen, everyone will be looking forward to dinner!
Ingredients
This recipe has three delicious components: crispy chicken bites, homemade honey garlic sauce, and colorful vegetable egg fried rice.
For the Crispy Chicken Bites
-
1½ pounds (680 g) boneless, skinless chicken breasts, cut into bite-sized pieces
-
½ cup cornstarch
-
2 tablespoons all-purpose flour
-
1 teaspoon garlic powder
-
½ teaspoon paprika
-
½ teaspoon salt
-
½ teaspoon black pepper
-
1 large egg, beaten
-
3 tablespoons vegetable oil, for frying
For the Sticky Honey Garlic Sauce
-
⅓ cup honey
-
¼ cup alcohol-free soy sauce
-
3 tablespoons ketchup
-
4 cloves garlic, minced
-
1 tablespoon rice vinegar
-
1 teaspoon freshly grated ginger
-
1 tablespoon brown sugar (optional)
-
1 teaspoon sesame oil
-
1 tablespoon cornstarch mixed with 2 tablespoons water
For the Vegetable Egg Fried Rice
-
4 cups cooked jasmine rice, preferably chilled
-
3 large eggs, lightly beaten
-
1 cup frozen peas and carrots
-
½ cup sweet corn kernels
-
3 tablespoons alcohol-free soy sauce
-
2 tablespoons vegetable oil
-
2 cloves garlic, minced
-
½ teaspoon sesame oil
-
¼ teaspoon black pepper
-
2 green onions, finely sliced
For Garnish
-
2 tablespoons chopped green onions
-
1 teaspoon sesame seeds (optional)
-
Fresh parsley (optional)
A little kitchen tip: Cold jasmine rice is one of the secrets to delicious homemade fried rice. Chilling the cooked rice helps the grains firm up, making them easier to separate in the skillet and less likely to become mushy.
Instructions
Step 1: Prepare the Jasmine Rice
If you haven’t already cooked the rice, start by preparing the jasmine rice according to the package instructions.
Once cooked, spread it evenly across a shallow tray to help it cool quickly.
Refrigerate the rice promptly until chilled. For food safety, avoid leaving cooked rice sitting at room temperature for extended periods.
Cold rice works beautifully for fried rice because the grains become firmer and separate more easily when stir-fried.
If you’re using properly refrigerated leftover rice, this step is already taken care of!
Step 2: Season the Chicken
Place the bite-sized chicken pieces in a large mixing bowl.
Sprinkle with garlic powder, paprika, salt, and black pepper.
Toss gently until every piece is evenly coated with the seasoning.
The garlic powder adds a wonderful savory base, while the paprika gives the chicken a warm, appetizing color.
Try to cut the chicken into similar-sized pieces so they cook evenly and stay tender.
Step 3: Coat the Chicken for a Crispy Finish
Pour the beaten egg over the seasoned chicken.
Mix gently until all the pieces are lightly coated.
In a separate bowl, combine the cornstarch and all-purpose flour.
Working in batches, transfer the chicken pieces into the dry mixture and toss until each piece has a thin, even coating.
The combination of cornstarch and flour helps create a delicate, golden crust that holds the sticky honey garlic sauce beautifully.
For the best texture, coat the chicken just before cooking.
Step 4: Cook the Chicken Until Golden
Heat the vegetable oil in a large nonstick skillet over medium-high heat.
Once the oil is hot, carefully add the coated chicken pieces in a single layer.
Avoid overcrowding the skillet. If necessary, cook the chicken in two or three batches.
Let the pieces cook for approximately 6–8 minutes, turning occasionally, until the outside becomes golden and lightly crispy.
You’ll hear a gentle sizzling sound as the coating develops its delicious crust.
The chicken should be fully cooked and reach an internal temperature of 165°F (74°C).
Transfer the cooked chicken to a clean plate and set aside while you prepare the sauce.
Step 5: Make the Honey Garlic Sauce
In a medium saucepan, combine the honey, alcohol-free soy sauce, ketchup, minced garlic, rice vinegar, freshly grated ginger, and sesame oil.
If you enjoy a sweeter glaze, add the optional brown sugar.
Place the saucepan over medium heat and stir gently as the ingredients warm.
As the sauce begins to simmer, the honey melts into the savory soy sauce while the garlic and ginger release their fragrant aromas.
The ketchup adds a subtle tanginess that balances the sweetness, creating a delicious sauce with layers of flavor.
Step 6: Thicken the Sauce
Give the cornstarch and water mixture a quick stir to make sure it’s smooth.
Slowly pour it into the simmering honey garlic sauce while stirring continuously.
Let the sauce cook for another 1–2 minutes.
You’ll notice it gradually becoming thicker, glossier, and beautifully sticky.
The finished sauce should be thick enough to coat the back of a spoon without becoming overly heavy.
If it thickens too much, simply add a small splash of water and stir until smooth.
Step 7: Coat the Chicken in the Sticky Glaze
Add the cooked chicken bites to the saucepan containing the warm honey garlic sauce.
Using a spoon or spatula, gently toss the chicken until every piece is coated in the glossy glaze.
The sauce should cling to the crispy coating, giving the chicken a beautiful golden-brown shine.
Keep the chicken warm over very low heat while you finish the fried rice, or set it aside covered.
For the best texture, avoid leaving the chicken in the sauce for too long, as the coating will gradually soften.
Step 8: Scramble the Eggs
Heat 1 tablespoon of vegetable oil in a large skillet or wok over medium heat.
Pour in the lightly beaten eggs.
Allow them to cook briefly before gently stirring with a spatula.
Continue cooking until the eggs are softly scrambled and fully set.
Transfer the cooked eggs to a clean plate and set aside.
They’ll be added back to the rice later, creating soft, flavorful pieces throughout the dish.
Step 9: Sauté the Garlic and Vegetables
Add the remaining tablespoon of vegetable oil to the same skillet.
Stir in the minced garlic and cook for about 30 seconds until fragrant.
Next, add the frozen peas and carrots, followed by the sweet corn kernels.
Stir-fry for approximately 3–4 minutes, until the vegetables are heated through and tender.
The peas bring a fresh green color, the carrots add a gentle sweetness, and the corn gives the fried rice little bursts of juicy flavor.
Together, they make the dish colorful, inviting, and satisfying.
Step 10: Stir-Fry the Jasmine Rice
Add the chilled jasmine rice to the skillet with the vegetables.
Use a spatula to gently break apart any clumps.
Stir-fry for approximately 3–5 minutes, tossing frequently so the rice heats evenly.
As the grains warm, they’ll begin to separate and develop a lightly toasted aroma.
For the best fried rice texture, use a large skillet or wok that gives the rice enough room to move around.
If your skillet is small, you can cook the rice in batches to prevent overcrowding.
Make sure the rice is heated thoroughly before moving on to the next step.
Step 11: Season the Fried Rice
Pour the alcohol-free soy sauce over the rice.
Add the sesame oil and sprinkle with black pepper.
Stir everything together until the rice is evenly seasoned.
Return the scrambled eggs to the skillet and gently fold them into the rice.
Finally, add the sliced green onions.
Give everything one last toss so the eggs, vegetables, and seasonings are distributed throughout.
The finished rice should be fluffy, colorful, and full of delicious savory flavor.
Step 12: Assemble the Chicken and Fried Rice
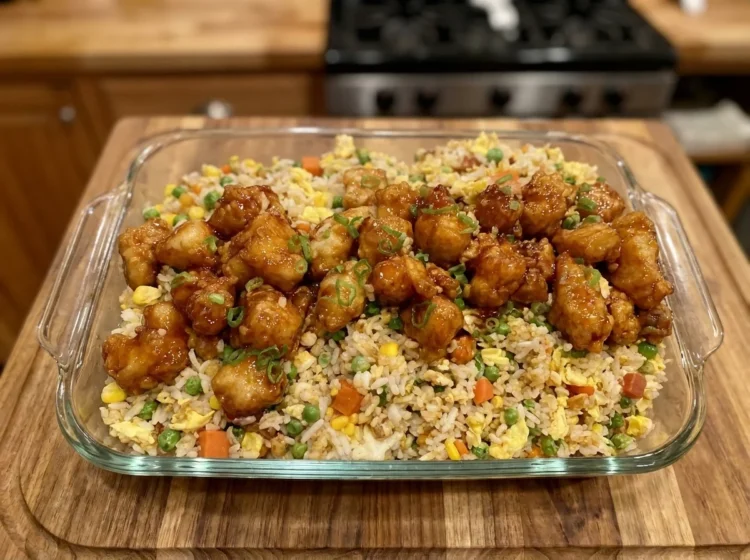
Spoon the warm vegetable egg fried rice onto a large serving platter or divide it between individual bowls.
Arrange the sticky honey garlic chicken bites generously over the top.
Let a little of the glossy honey garlic sauce settle into the rice below.
The combination of golden chicken, fluffy rice, yellow corn, orange carrots, and bright green peas creates a beautiful presentation that’s almost too good to resist.
Step 13: Garnish and Serve
Drizzle any remaining honey garlic sauce over the chicken.
Sprinkle with freshly chopped green onions and optional sesame seeds.
If you like, finish with a little fresh parsley for an extra touch of color.
Serve immediately while the chicken is warm, the glaze is glossy, and the fried rice is perfectly fluffy.
Presentation and Serving Ideas
One of the loveliest things about this recipe is how naturally colorful it looks.
The golden honey garlic chicken contrasts beautifully with the fluffy fried rice, bright vegetables, and fresh green onions.
For a cozy family dinner, serve everything in large, deep bowls. Start with a generous layer of vegetable egg fried rice, then pile the sticky chicken bites on top.
Drizzle a little extra honey garlic sauce over the chicken and finish with sesame seeds and freshly chopped green onions.
If you’re preparing this dish for guests, arrange the fried rice across a large serving platter and place the chicken bites neatly in the center.
A sprinkle of fresh herbs gives it a simple, restaurant-style finish.
Delicious Side Dishes to Serve Alongside
Although this recipe is already a complete meal, a few simple sides can make it even more enjoyable.
-
Steamed broccoli: A fresh, tender vegetable that pairs beautifully with the sweet honey garlic glaze.
-
Cucumber salad: Cool, crisp cucumbers provide a refreshing contrast to the warm chicken.
-
Garlic green beans: A simple, flavorful addition that complements the fried rice.
-
Roasted vegetables: A colorful side that makes the meal even heartier.
-
Fresh pineapple slices: Their juicy sweetness works wonderfully with the honey garlic flavors.
-
Light vegetable soup: A warm, comforting starter for a family-style dinner.
For an extra-special presentation, sprinkle toasted sesame seeds over the chicken just before serving.
Helpful Tips for Perfect Honey Garlic Chicken and Fried Rice
Use chilled rice. Cold, properly refrigerated rice is easier to stir-fry and produces a fluffier texture than freshly cooked, steaming-hot rice.
Cut the chicken evenly. Similar-sized chicken pieces cook more consistently and help prevent smaller pieces from drying out.
Coat the chicken just before frying. This helps maintain a light, crisp coating.
Don’t overcrowd the skillet. Cooking chicken in batches allows it to brown beautifully instead of steaming.
Cook the chicken thoroughly. Always check that the thickest pieces reach an internal temperature of 165°F (74°C).
Keep the honey garlic sauce at a gentle simmer. Honey can burn if heated too aggressively, so stir frequently and avoid boiling the sauce rapidly.
Adjust the sweetness to your taste. For a less sweet sauce, skip the optional brown sugar or slightly reduce the honey.
Toss the chicken in the sauce near serving time. This helps preserve some of the crispy texture beneath the sticky glaze.
Use a large skillet for the fried rice. Plenty of space helps the grains separate and toast evenly.
Store leftovers safely. Refrigerate leftovers in shallow, airtight containers within two hours of cooking. Reheat until thoroughly hot, and avoid repeatedly cooling and reheating the same portion of rice.
Nutritional Information
-
⏰ Prep Time: 20 minutes
-
🍳 Cooking Time: 30 minutes
-
⌛ Total Time: 50 minutes
-
🔥 Calories: Approximately 680 kcal per serving
-
🍽️ Servings: 6
-
🥩 Protein: 42 g
-
🍚 Carbohydrates: 78 g
-
🧈 Total Fat: 21 g
-
🌾 Dietary Fiber: 4 g
-
🍬 Sugar: 24 g
-
🧂 Sodium: 980 mg
-
Cholesterol: 165 mg
-
Saturated Fat: 4 g
Total time assumes the jasmine rice is already cooked and chilled.
Conclusion
Sometimes the best dinners are the ones that bring together familiar ingredients in a way that feels a little more exciting, and these Sticky Honey Garlic Chicken Bites with Vegetable Egg Fried Rice are a wonderful example.
With golden chicken coated in a rich honey garlic glaze, fluffy jasmine rice, tender scrambled eggs, and colorful vegetables, every bite delivers a comforting combination of sweet, savory, and satisfying flavors.
It’s a meal that feels special enough for a weekend gathering but is simple enough to prepare whenever you’re craving something delicious and homemade.
The crispy chicken adds wonderful texture, the glossy sauce brings everything together, and the vegetable fried rice makes the entire dish hearty and filling.
Whether you’re cooking for your family, preparing dinner for friends, or simply treating yourself to a homemade takeout-style favorite, this recipe is a delicious choice.
So the next time you’re wondering what to make with chicken and rice, gather your ingredients and give this sweet and savory combination a try.
Once you taste those tender chicken bites covered in sticky honey garlic sauce alongside warm, fluffy vegetable egg fried rice, you may find yourself making this recipe again and again.
Happy cooking, and enjoy every delicious bite! 🍯🍗🍚