Garlic Butter Shrimp Chicken Fried Rice

There’s something incredibly satisfying about a big skillet of homemade fried rice sizzling on the stove. The wonderful aroma of garlic cooking in butter, tender chicken turning golden brown, and juicy shrimp soaking up all those delicious flavors is enough to make everyone wander into the kitchen to see what’s for dinner.
This Garlic Butter Shrimp & Chicken Fried Rice is the kind of meal that turns a simple evening into something special.
Imagine fluffy jasmine rice stir-fried until lightly toasted, tossed with colorful vegetables, soft scrambled eggs, and a savory garlic soy sauce. Then comes the best part: golden, perfectly seasoned chicken and plump shrimp coated in rich garlic butter.
Every spoonful brings together something wonderful. The chicken is tender and flavorful, the shrimp are buttery and juicy, the rice is fluffy, and the fresh green onions add just the right amount of brightness.
It’s everything you love about restaurant-style fried rice, made fresh in your own kitchen with simple ingredients.
Whether you’re looking for a hearty weeknight dinner, preparing a delicious meal for the whole family, or craving your favorite takeout without leaving home, this recipe is a wonderful choice.
And because everything comes together in one large skillet or wok, you won’t have a mountain of dishes waiting for you afterward.
Ingredients You’ll Need
One of the best things about this recipe is how ordinary ingredients come together to create something so delicious. A combination of fresh garlic, butter, simple seasonings, and savory sauces gives this fried rice its irresistible flavor.
For the Golden Garlic Chicken
-
1 lb (450 g) boneless, skinless chicken thighs, cut into bite-sized pieces
-
1 tablespoon olive oil
-
1 teaspoon garlic powder
-
½ teaspoon smoked paprika
-
½ teaspoon freshly ground black pepper
-
½ teaspoon salt
For the Garlic Butter Shrimp
-
1 lb (450 g) large shrimp, peeled and deveined
-
2 tablespoons unsalted butter
-
3 cloves garlic, finely minced
-
½ teaspoon paprika
-
½ teaspoon freshly ground black pepper
-
1 tablespoon freshly squeezed lemon juice
For the Savory Fried Rice
-
4 cups cooked jasmine rice, preferably chilled
-
3 large eggs, lightly beaten
-
1 cup diced carrots and green peas
-
1 small onion, finely diced
-
4 green onions, chopped
-
3 cloves garlic, minced
-
2 tablespoons vegetable oil
-
1 tablespoon sesame oil
-
3 tablespoons alcohol-free, low-sodium soy sauce
-
1 tablespoon oyster sauce (alcohol-free, if available)
-
1 teaspoon freshly grated ginger
-
½ teaspoon freshly ground black pepper
For Garnishing
-
2 tablespoons freshly chopped green onions
-
1 teaspoon sesame seeds (optional)
How to Make Garlic Butter Shrimp & Chicken Fried Rice
This delicious fried rice may look like something you’d order at your favorite restaurant, but it’s surprisingly simple to prepare at home.
The secret is cooking the chicken and shrimp separately, using chilled rice, and adding the flavorful sauces at just the right moment.
Once your ingredients are prepared, the cooking moves quickly, so it’s helpful to have everything ready before turning on the stove.
Step 1: Prepare the Jasmine Rice
Start by cooking the jasmine rice according to the package instructions if you don’t already have some prepared.
Once the rice is cooked, spread it across a large tray or shallow dish to help it cool quickly.
Refrigerate it promptly until completely chilled.
For the best results, use rice that has been cooked and refrigerated the day before. Cold rice has a firmer texture, which helps the grains stay separate when stir-fried.
This is one of the easiest ways to achieve that delicious restaurant-style fried rice texture.
Before adding the rice to your skillet, gently break up any clumps with a fork or your fingers.
Step 2: Season the Chicken
Place the bite-sized chicken pieces in a medium mixing bowl.
Sprinkle with garlic powder, smoked paprika, black pepper, and salt.
Toss everything together until the chicken is evenly coated with the seasonings.
The smoked paprika adds a lovely warm color, while the garlic powder gives the chicken a delicious savory flavor.
Let the seasoned chicken sit briefly while you heat the skillet.
Step 3: Cook the Chicken Until Golden
Heat 1 tablespoon of olive oil in a large skillet or wok over medium-high heat.
Once the oil is hot, carefully add the seasoned chicken pieces in a single layer.
Let them cook undisturbed for a couple of minutes so they develop a beautiful golden crust.
Then stir occasionally and continue cooking for approximately 6–8 minutes, until the chicken is browned on the outside and fully cooked inside.
Use a meat thermometer to make sure the thickest pieces reach 165°F (74°C).
The chicken should smell wonderfully savory, with little golden edges that add extra flavor to the finished rice.
Transfer the cooked chicken to a clean plate and set aside.
Step 4: Prepare the Garlic Butter Shrimp
Reduce the heat to medium and add 2 tablespoons of unsalted butter to the same skillet.
As the butter melts, gently swirl it around the pan.
Add the minced garlic and stir for about 30 seconds, just until fragrant.
You’ll immediately notice that irresistible aroma of warm garlic and butter filling the kitchen.
Be careful not to let the garlic burn, as it can quickly become bitter.
Step 5: Cook the Shrimp Until Juicy and Tender
Add the peeled and deveined shrimp to the garlic butter.
Sprinkle with paprika and black pepper, then gently toss to coat.
Cook the shrimp for approximately 2–3 minutes per side, depending on their size.
They should turn pink and opaque, with a tender texture and a light golden coating from the buttery seasonings.
Once cooked, drizzle the fresh lemon juice over the shrimp and give everything one final toss.
The lemon adds a lovely brightness that balances the richness of the garlic butter.
Transfer the shrimp to the plate with the cooked chicken.
If there’s a little garlic butter left in the skillet, leave it there. It will add wonderful flavor to the fried rice.
Step 6: Scramble the Eggs
Add 1 tablespoon of vegetable oil to the skillet and reduce the heat to medium if necessary.
Pour in the lightly beaten eggs.
Allow them to begin setting, then gently stir with a spatula to create soft scrambled pieces.
Cook until the eggs are just set but still tender.
Remove them from the skillet and place them on a separate plate.
They’ll go back into the fried rice later, adding a soft, fluffy texture to every bite.
Step 7: Sauté the Colorful Vegetables
Add the remaining tablespoon of vegetable oil to the skillet.
Toss in the finely diced onion, carrots, and green peas.
Stir-fry for approximately 3–4 minutes, until the vegetables begin to soften and the onions become slightly translucent.
The carrots add a gentle sweetness, while the peas bring a lovely pop of color.
Next, add the minced garlic and freshly grated ginger.
Stir for another 30 seconds, just until fragrant.
At this point, your kitchen will be filled with the wonderful aroma of garlic, ginger, and savory vegetables.
Step 8: Fry the Rice Until Lightly Toasted
Increase the heat to medium-high and add the chilled jasmine rice to the skillet.
Use a spatula to break up any remaining clumps.
Stir-fry the rice for approximately 4–5 minutes, tossing it with the vegetables.
Try to spread the rice across the hot surface of the skillet between stirs. This helps some of the grains develop a lightly toasted texture.
The rice should become hot, fluffy, and beautifully mixed with the colorful vegetables.
If your skillet is small, fry the rice in two batches rather than overcrowding the pan.
Step 9: Add the Savory Garlic Soy Sauce
Drizzle the alcohol-free soy sauce and oyster sauce over the fried rice.
Add the sesame oil and freshly ground black pepper.
Toss everything together continuously until the rice is evenly coated.
The soy sauce gives the rice its delicious savory depth, while the oyster sauce adds a subtle richness.
The sesame oil brings a wonderful nutty aroma that makes the whole dish feel like your favorite restaurant fried rice.
Continue stir-frying for another minute or two until the sauce is fully incorporated and the rice is heated through.
Step 10: Bring Back the Chicken and Eggs
Return the golden chicken pieces and scrambled eggs to the skillet.
Gently fold them into the rice and vegetables.
Continue cooking for approximately 2 minutes, stirring occasionally, until everything is hot and well combined.
The chicken will soak up a little of the savory sauce, while the soft scrambled eggs blend beautifully with the fluffy rice.
Add the chopped green onions and toss gently.
Step 11: Add the Garlic Butter Shrimp
Now it’s time to bring everything together.
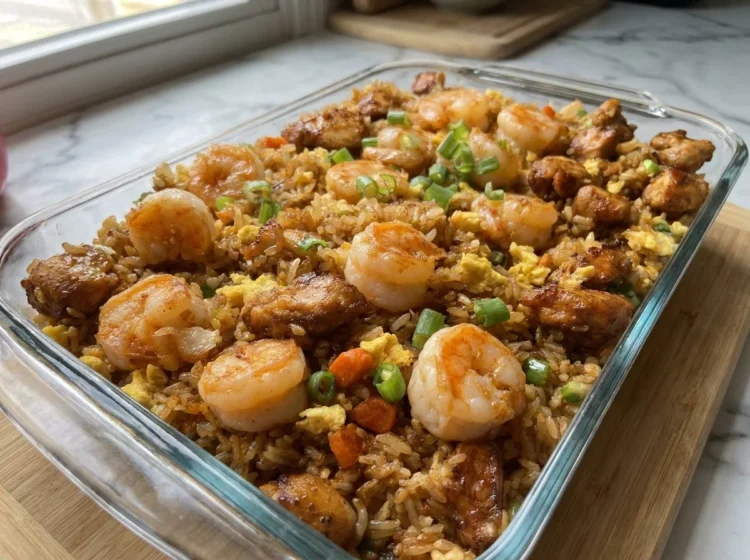
Arrange the garlic butter shrimp over the fried rice, allowing some of the shrimp to nestle between the chicken and vegetables.
Gently fold a few shrimp into the rice while leaving the rest on top for a beautiful presentation.
If any garlic butter juices remain on the shrimp plate, drizzle them over the rice for an extra burst of flavor, provided they’re from the fully cooked shrimp.
The combination of golden chicken, juicy shrimp, and fragrant fried rice looks absolutely irresistible.
Step 12: Garnish and Serve
Turn off the heat and transfer the fried rice to a large serving platter or individual bowls.
Sprinkle freshly chopped green onions over the top.
If you enjoy a little extra texture, finish with a light sprinkle of sesame seeds.
Serve immediately while the rice is warm, the chicken is tender, and the shrimp are juicy and buttery.
Every spoonful is packed with delicious garlic flavor, savory rice, colorful vegetables, and perfectly cooked seafood.
Presentation: Make Your Fried Rice Look Restaurant-Worthy
One of the most appealing things about this dish is how colorful and inviting it looks once everything is combined.
The golden chicken, pink shrimp, fluffy rice, bright green peas, and orange carrots create a beautiful combination that needs very little decoration.
For a lovely family-style presentation, spoon the fried rice onto a large serving platter.
Arrange the shrimp neatly across the top and scatter the golden chicken pieces between them.
Finish with a generous sprinkle of freshly chopped green onions and a few sesame seeds.
If you want to make individual servings feel extra special, divide the fried rice between deep bowls and arrange several shrimp and chicken pieces on top of each portion.
A small sprinkle of green onions adds freshness and makes the colors pop.
This fried rice is already a complete meal, but you can serve it with simple sides such as steamed broccoli, sautéed green beans, a fresh cucumber salad, or lightly stir-fried vegetables.
A few lemon wedges on the side are also a wonderful addition for anyone who enjoys a bright citrus finish with their shrimp.
Helpful Tips for the Best Shrimp & Chicken Fried Rice
A few small cooking tricks can make your homemade fried rice taste even better.
-
Use chilled jasmine rice: Cold, day-old rice gives the dish a light, fluffy texture and helps prevent mushiness.
-
Cook the chicken and shrimp separately: They require different cooking times, so preparing them individually helps keep both tender and flavorful.
-
Don’t overcrowd the skillet: Giving the ingredients enough room allows them to develop a delicious golden surface.
-
Use fresh garlic: Freshly minced garlic gives the butter and rice a richer, more aromatic flavor.
-
Add sesame oil toward the end: This helps preserve its delicious nutty fragrance.
-
Keep the shrimp tender: Remove them from the heat as soon as they’re fully cooked, pink, and opaque.
-
Taste before adding extra salt: Soy sauce and oyster sauce already contain sodium, so additional seasoning may not be necessary.
Chef’s Special Tip
For an extra rich, restaurant-style finish, melt a small additional pat of butter with a little minced garlic in a clean skillet.
Let the garlic become fragrant, then drizzle the warm butter over the finished fried rice just before serving.
This simple touch gives the rice a beautiful glossy appearance and makes the garlic flavor even more delicious.
Just remember that the extra butter will increase the calorie content slightly.
How to Store and Reheat Leftovers
If you have leftovers, this garlic butter shrimp and chicken fried rice can make a delicious lunch the next day.
Allow the rice to cool quickly, then transfer it to shallow airtight containers and refrigerate promptly, within two hours of cooking.
For the best quality and extra caution with cooked rice, enjoy refrigerated leftovers within 24 hours.
When you’re ready to reheat, place the fried rice in a large skillet with a small splash of water.
Warm over medium heat, stirring gently, until the entire dish is steaming hot and reaches 165°F (74°C).
Avoid heating it longer than necessary, since both shrimp and chicken can become dry when overcooked.
Reheat only the portion you plan to eat rather than warming the same batch repeatedly.
Preparation & Cooking Time
-
🕒 Prep Time: 20 minutes
-
🍳 Cooking Time: 30 minutes
-
⏱️ Total Time: 50 minutes
-
🍽️ Servings: 6
💡 Nutrition Note: Values are approximate, recalculated from the listed ingredients, and may vary depending on chicken cuts, shrimp size, rice portions, cooking oils, and sauce brands.
Conclusion: A Homemade Dinner Worth Sharing
Some meals are special because they’re comforting. Others are memorable because they’re packed with bold, delicious flavors. This Garlic Butter Shrimp & Chicken Fried Rice brings both together in one satisfying dish.
From the juicy, garlic butter shrimp and golden chicken to the fluffy jasmine rice, colorful vegetables, and savory sauce, every bite is full of wonderful flavor.
It’s hearty enough to satisfy a hungry family, simple enough for a busy weeknight, and delicious enough to make everyone feel like they’re enjoying a restaurant-quality dinner at home.
And there’s something especially lovely about gathering around the table with a big platter of warm, fragrant fried rice, knowing that you made it yourself.
So the next time you’re craving your favorite takeout-style meal, grab your skillet, some fresh garlic, and a handful of simple ingredients.
Because sometimes, the best dinners are made right at home—with a little butter, plenty of garlic, and a whole lot of love. 🍤🍗🍚❤️