Oven-Baked Cheesy Garlic Chicken Wraps with Golden Parmesan Crust

If you’re looking for a meal that combines crispy tortillas, creamy melted cheese, and flavorful chicken, these Oven-Baked Cheesy Garlic Chicken Wraps are sure to become a favorite. They’re filled with tender shredded chicken, a rich garlic cream cheese mixture, and plenty of mozzarella and cheddar, then brushed with garlic Parmesan butter and baked until beautifully golden.
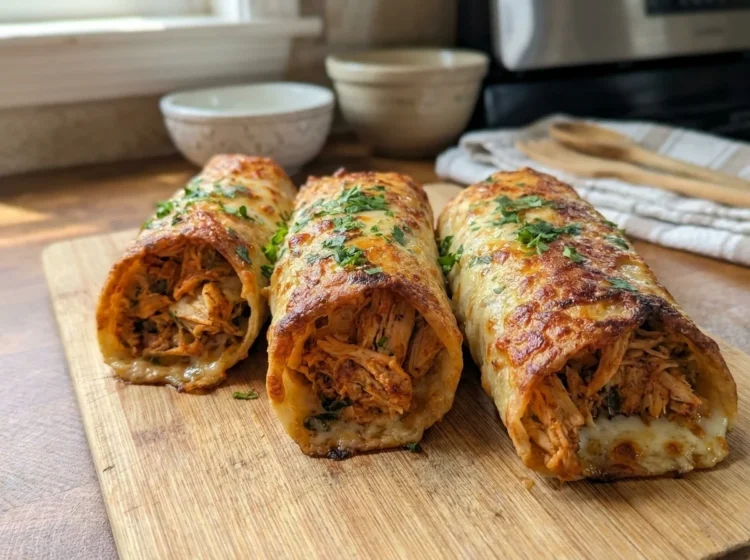
Imagine pulling a tray of freshly baked wraps from the oven. The tortillas have crisp, golden edges, the Parmesan topping smells wonderfully garlicky, and the cheesy filling is warm, creamy, and delicious. Cut one open, and you’ll find juicy shredded chicken coated in a savory cheese mixture with fragrant herbs in every bite.
What makes these wraps so special is the contrast between their crispy exterior and soft, creamy center. Cream cheese and sour cream keep the filling rich and smooth, while mozzarella brings that lovely melted-cheese texture and cheddar adds a deeper, savory flavor. Garlic, paprika, and Italian seasoning tie everything together, giving the chicken a delicious boost without requiring complicated ingredients.
And let’s not forget the garlic butter topping! Brushed generously over the tortillas and finished with grated Parmesan, it creates a flavorful crust that makes these wraps feel like something you’d order at your favorite casual restaurant.
The best part is how easy they are to prepare. Using cooked shredded chicken saves time, and the wraps can be assembled ahead of baking, making them perfect for busy weeknights, relaxed weekend lunches, or a quick homemade dinner when you’re craving something cheesy and satisfying.
Serve them hot with a fresh green salad, crispy potato wedges, or your favorite dipping sauce. Once you taste that golden Parmesan crust and creamy chicken filling together, you’ll understand why these wraps deserve a place in your regular meal rotation.
Ingredients
For the Chicken Filling
- 2 cups (300 g) cooked shredded chicken breast
- 4 large flour tortillas
- 4 ounces (115 g) cream cheese, softened
- 1 cup (100 g) shredded mozzarella cheese
- ½ cup (50 g) shredded cheddar cheese
- ¼ cup (60 g) sour cream
- 2 cloves garlic, minced
- 1 teaspoon paprika
- 1 teaspoon Italian seasoning
- ½ teaspoon garlic powder
- ½ teaspoon onion powder
- ½ teaspoon black pepper
- ½ teaspoon salt, or to taste
- 2 tablespoons fresh parsley, chopped
For the Garlic Butter Topping
- 3 tablespoons butter, melted
- 2 cloves garlic, minced
- 2 tablespoons grated Parmesan cheese
- 1 tablespoon fresh parsley, chopped
- ½ teaspoon Italian seasoning
- A pinch of paprika, optional
For Extra Cheese
- ½ cup (50 g) shredded mozzarella cheese
- 2 tablespoons grated Parmesan cheese
Instructions
Step 1: Preheat the Oven
Start by preheating your oven to 375°F (190°C). Line a baking tray with parchment paper or lightly grease a baking dish.
Preparing the tray first makes assembling the wraps easier, so you can transfer them straight to the oven once they’re filled and brushed with garlic butter.
A flat baking tray works particularly well because it allows hot air to circulate around the tortillas, helping them become crisp and golden.
Step 2: Prepare the Shredded Chicken
If you’re using freshly cooked chicken breast, allow it to cool slightly before shredding it with two forks. Pull the meat into small, even pieces so it mixes easily with the creamy filling.
Leftover roasted chicken works wonderfully here, too. It’s a convenient way to turn yesterday’s dinner into something completely different.
If you’re using refrigerated cooked chicken, keep it chilled until you’re ready to prepare the filling. Make sure the finished wraps become thoroughly hot in the center during baking.
Step 3: Make the Creamy Garlic Cheese Mixture
In a large mixing bowl, combine the softened cream cheese and sour cream. Stir until the mixture becomes smooth and creamy.
Add the minced garlic, paprika, Italian seasoning, garlic powder, onion powder, salt, and black pepper. Mix everything together until the seasonings are evenly distributed.
The softened cream cheese makes a big difference here. It blends more easily with the sour cream, creating a smooth base that coats the chicken without leaving large lumps.
The fresh garlic adds a savory kick, while the paprika and Italian herbs bring warmth and aroma to the filling.
Step 4: Add the Chicken and Cheese
Add the shredded chicken to the cream cheese mixture and stir until every piece is coated.
Next, fold in the mozzarella, cheddar, and chopped fresh parsley. Mix gently until the cheese and herbs are evenly distributed throughout the filling.
The mixture should be creamy, thick, and easy to spoon onto the tortillas. The mozzarella provides a stretchy, melted texture, while the cheddar adds a rich, cheesy flavor.
If you enjoy a little extra heat, you can also add a small pinch of chili powder or red pepper flakes at this stage.
Step 5: Fill the Tortillas
Lay the four flour tortillas flat on a clean work surface.
Divide the chicken filling evenly among them, placing a generous strip of filling across the center of each tortilla. Leave enough space around the edges to fold the wraps securely.
Try not to overfill them, even if the cheesy mixture looks tempting. Keeping the filling contained makes rolling easier and helps prevent the cheese from escaping during baking.
Spread the filling into a compact shape rather than leaving it in one large mound. This helps distribute the chicken and cheese evenly throughout each wrap.
Step 6: Fold and Roll the Wraps
Fold the left and right sides of each tortilla inward over the filling. Then roll the tortilla tightly from the bottom upward until the filling is enclosed.
Place each wrap on the prepared baking tray with the seam facing down. This helps keep the wraps closed while they bake.
Arrange them with a little space between each one so the edges can crisp evenly.
If your tortillas feel stiff and begin cracking as you roll them, warm them briefly according to the package instructions. Softer tortillas are easier to fold without tearing.
Step 7: Prepare the Garlic Parmesan Butter
In a small bowl, combine the melted butter, minced garlic, grated Parmesan, chopped parsley, and Italian seasoning.
Stir until the garlic and herbs are evenly mixed throughout the butter.
The aroma is wonderful already, but it becomes even better once the garlic butter hits the hot tortillas in the oven.
The butter encourages browning, while the Parmesan adds a savory, cheesy finish to the outside of each wrap.
Step 8: Brush and Add the Cheese Topping
Using a pastry brush, generously coat the tops and sides of the wraps with the garlic Parmesan butter.
Make sure you reach the edges, where the tortillas can become especially crisp and golden.
Sprinkle the extra mozzarella and Parmesan over the tops. If you’d like a deeper golden color, finish with a light dusting of paprika.
The topping gives the wraps their delicious crust and adds another layer of garlic and cheese flavor without making the filling overly heavy.
Step 9: Bake Until Golden and Hot
Place the tray in the preheated oven and bake for approximately 18–25 minutes.
As the wraps bake, the tortillas should become lightly crisp, the cheese topping should melt, and the edges should turn a beautiful golden brown.
Because the filling contains cooked chicken, baking time will depend partly on how cold the filling was when assembled. Make sure the center of each wrap is thoroughly hot; if you’re using refrigerated chicken, check that the filling reaches 165°F (74°C).
For an extra-golden finish, switch to the broiler for the final 1–2 minutes if needed. Watch closely, as the Parmesan and garlic can brown quickly.
When they’re ready, the wraps should smell wonderfully savory, with crisp edges and a melted, cheesy center.
Step 10: Rest Before Cutting
Remove the wraps from the oven and allow them to rest for approximately 3–5 minutes.
This short resting period gives the melted cheese a chance to settle, making the wraps easier to handle and slice without losing too much filling.
Avoid leaving them on the hot tray for too long, as the bottoms may continue to brown and become overly crisp.
Step 11: Garnish and Serve
Sprinkle the wraps with fresh parsley and a little extra grated Parmesan.
Transfer them to a serving platter and slice each one diagonally using a sharp knife. The cut reveals the creamy chicken filling and melted cheese inside, making the wraps especially appetizing.
Serve warm with garlic sauce, ranch-style dressing, or your favorite dipping sauce. A fresh green salad or a side of roasted potatoes makes the meal even more satisfying.
For the best experience, enjoy them soon after baking, while the outside is crisp and the filling remains warm and creamy.
Presentation
For an inviting, restaurant-style presentation, arrange the golden wraps on a large serving platter with their diagonal cut sides facing upward. This showcases the creamy chicken filling, melted mozzarella, and cheddar inside.
Sprinkle freshly chopped parsley over the wraps and add a light dusting of Parmesan just before serving. The green herbs contrast beautifully with the golden tortillas and give the dish a fresh, homemade appearance.
Place small bowls of garlic sauce or ranch-style dressing alongside the platter so everyone can dip their wraps as they like. A few lemon wedges can also add a bright finishing touch, especially if you’re serving the wraps with a fresh salad.
For individual plates, serve one whole wrap or two halves alongside crispy potato wedges, roasted vegetables, or a simple green salad. You can drizzle a little extra garlic sauce over the side dish, but keep the wraps themselves mostly uncovered to preserve their crisp exterior.
If you’re preparing lunch for guests, a wooden serving board makes a lovely base. Arrange the wraps in a neat row, add the dipping sauces in small bowls, and finish with fresh parsley scattered around the edges.
Serve everything while the wraps are still warm, the cheese is melted, and the garlic Parmesan crust is golden and fragrant.
Chef’s Tips for the Best Results
- For extra-crispy wraps: Avoid overfilling the tortillas and always place them seam-side down on the baking tray.
- For the creamiest filling: Allow the cream cheese to soften before mixing so it blends smoothly with the sour cream and seasonings.
- For more garlic flavor: Add a little extra minced garlic to the filling or garlic butter, adjusting to your taste.
- For a golden Parmesan crust: Brush the tortillas generously with garlic butter and finish with freshly grated Parmesan.
- For easier preparation: Use leftover roasted chicken or freshly cooked chicken breast shredded ahead of time.
- For better texture: Let the wraps rest briefly before slicing so the melted cheese stays inside.
- For extra flavor: Add a pinch of smoked paprika, a little chili powder, or finely chopped chives to the filling.
- For convenient meal prep: Assemble the wraps ahead of time, cover, and refrigerate until ready to bake. Brush with garlic butter just before putting them in the oven, and allow extra baking time if they are cold.
Nutritional Information
-
⏰ Prep Time: 20 minutes
-
🍳 Cooking Time: 20–25 minutes
-
🕒 Total Time: 40–45 minutes
-
🔥 Calories: Approximately 450–550 kcal per wrap
-
🍽️ Servings: 4 wraps
Conclusion
These Oven-Baked Cheesy Garlic Chicken Wraps with Golden Parmesan Crust are everything you could want in a comforting homemade meal: crispy tortillas, tender chicken, creamy cheese, and plenty of delicious garlic flavor.
The creamy filling brings together mozzarella, cheddar, cream cheese, and aromatic herbs, while the garlic Parmesan butter creates a beautifully golden exterior that makes every bite special. Best of all, the recipe uses simple ingredients and comes together without complicated cooking techniques.
Whether you’re preparing an easy family dinner, a relaxed weekend lunch, or a satisfying snack, these wraps are wonderfully versatile. Serve them with your favorite dipping sauce, add some roasted potatoes or a fresh salad, and enjoy a meal that feels both cozy and delicious.
So grab those tortillas, mix up the creamy chicken filling, and let the oven work its magic. When the wraps emerge golden and fragrant, slice them open, serve them warm, and enjoy every cheesy, garlicky bite!